Photo Booth Layouts and Frames: All 6 Layouts and 13 Frames, Explained
Explore all 6 photo booth layouts and 13 frames. Find the perfect style for parties, weddings, and Instagram. Try yours free!
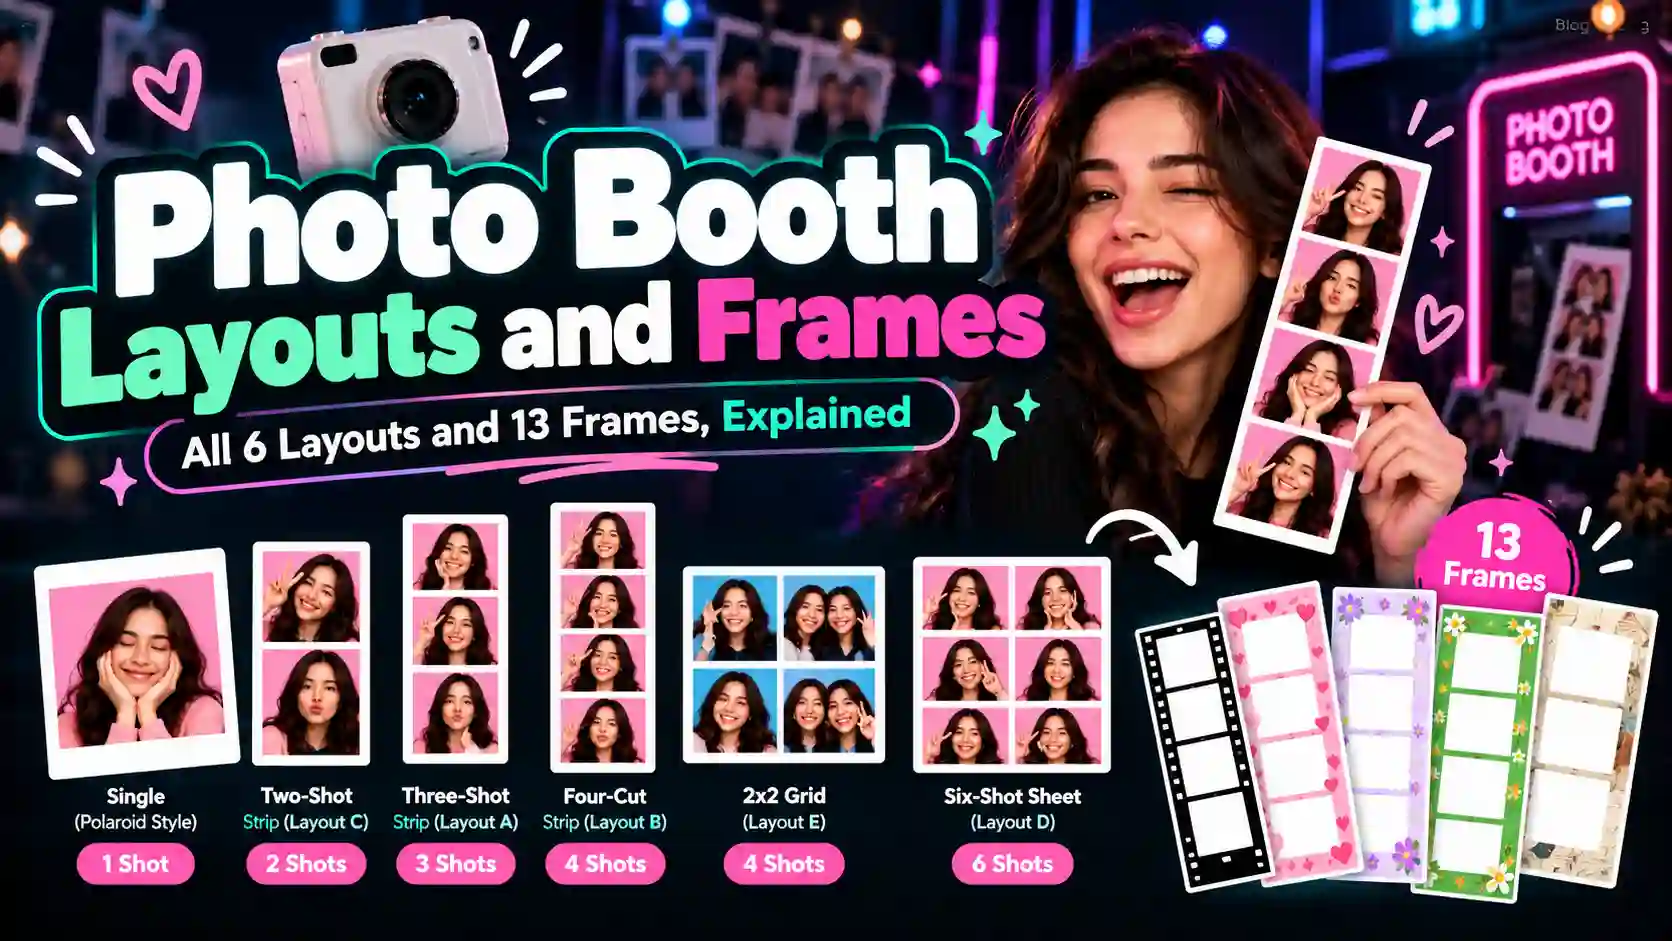
Most people open a photo booth, tap the first option they see, and then find out they picked a six-shot sheet for a photo of one person. That small slip happens because photo booth layouts look alike as tiny thumbnails, even though each one decides how many times the camera fires. The layout is also the one choice you cannot undo, because changing it later means shooting every pose again. Frame colors, stickers, and borders work differently, since you can still swap them after the last countdown ends.
This guide covers all six photo booth layouts and all 13 frames on TryPhotoBooth, with what each one produces on screen and on paper. You will also see which option fits a wedding, a birthday party, or an Instagram post, so your next strip comes out right the first time.
Layout vs Frame: What Is the Difference?
A layout is the skeleton of your picture, because it sets how many shots the camera takes and where each one sits on the finished design. A frame is the skin that goes on top of that skeleton, which means the border color, the theme, the stickers and the starting filter. On TryPhotoBooth, every frame is built for a fixed number of slots, so choosing a themed frame quietly chooses its layout for you as well. That is why photo booth layouts deserve a few seconds of thought before you press the start button.
The 6 Photo Booth Layouts
All six photo booth layouts on the site come down to two simple questions, which are how many shots you want and what shape the final image should take. The table below gives you the quick version before each layout gets its own short section.
| Layout | Shots | Shape and size | Best for |
|---|---|---|---|
| Single (Studio Mode) | 1 | Polaroid-style print with a thick bottom border | Portraits, guest books, shy guests |
| Two-shot strip (Layout C) | 2 | Tall 6 x 2 strip | Couples and quick photos |
| Three-shot strip (Layout A) | 3 | Tall strip with larger windows | Families, kids, work events |
| Four-cut strip (Layout B) | 4 | Tall 6 x 2 strip | Friends, parties, keepsakes |
| 2x2 grid (Layout E) | 4 | Wider 6 x 4 sheet | Groups and Instagram posts |
| Six-shot sheet (Layout D) | 6 | Wider 6 x 4 sheet | Big groups and long sequences |
Single (Polaroid Style)
The single layout, called Studio Mode on the site, is the simplest choice among photo booth layouts because it takes one photo and places it inside a thick white border that copies the look of an instant print. A real Polaroid 600 or i-Type print measures about 3.5 by 4.2 inches overall, with a nearly square picture area of about 3.1 inches. That wide bottom edge is where people have always written names and dates, and Studio Mode keeps the idea by giving you room for a caption and a date stamp. One shot also takes the pressure off people who dislike posing, since they only need to smile once. The trade-off is that a single frame catches everyone at their most posed, so you lose the relaxed moments that a longer strip collects.
Two-Shot Strip
Layout C takes two photos and stacks them in a tall strip, which makes it the quickest sequence in the booth. Couples like it because the first shot is usually the careful pose and the second one catches the laugh that follows. Two panels also leave each photo bigger than it would be in a four-cut strip, so faces stay easy to see on a small phone screen. It suits a quick moment at a wedding table or a date night photo when nobody wants a long session. If you want a story with a clear beginning, middle, and end, though, two shots can feel a little short.
Three-Shot Strip
Layout A takes three photos with generous margins and a stamp area at the bottom, which gives it a calmer, more formal look than the four-shot version. The larger photo windows help when you are photographing older relatives, small children or coworkers who are being polite about the whole idea. Three countdowns still give you a small sequence, so people loosen up a little by the last shot without feeling worn out. Korean booth brands such as Photoism offer three-cut frames for the same reason, since some groups simply prefer fewer poses. Choose this layout for family dinners, office parties and any event where four rounds of posing would feel like too much.
Four-Cut Strip
Layout B is the four-cut strip, the tall stack of four photos that most people imagine when they hear the words photo booth. Its roots go back to the mid-1920s, when Anatol Josepho's Photomaton on Broadway in New York sold strips of eight photos for 25 cents. The four-photo version later became a craze in South Korea, where Life Four Cuts opened in Daegu in 2017 and turned strips into a weekend habit for friends. Apple's Mac Photo Booth app offers a similar option called a 4-up photo, with a three-second countdown before each shot. Among all the photo booth layouts, this one tells the best story because people relax as the shots go on. The first panel is usually a careful smile, while the fourth often shows someone laughing or pulling a face. Four countdowns take roughly 15 to 20 seconds in total, which is quick enough for most parties.
2x2 Grid
Layout E arranges four photos in a 2x2 grid, so the finished image is much wider than a strip and every panel has more room. That extra width makes it the most group-friendly of the photo booth layouts, because two or three friends can fit inside each panel without squeezing into a narrow box. It also helps on social media, although the rules changed in January 2025 when Instagram swapped its square profile grid for taller 3:4 tiles. Feed posts now look best at 4:5, which is 1080 by 1350 pixels, and a tall strip loses its top and bottom panels when Instagram trims it to fit a profile tile. A grid keeps far more of its photos visible in that space, which is why the site designs this layout with Instagram posts and profile pictures in mind.
Six-Shot Sheet
Layout D takes six photos on a larger sheet, which makes it the longest option among photo booth layouts and the strongest choice for a big group. Six panels let a crowd split into pairs, or let one person try six different poses in a row. The catch is time, since six countdowns plus the pauses between them run close to half a minute. Use this layout when you have the booth to yourselves, such as a sleepover, a family night or a small team photo after work.
The 13 Photo Booth Frames
The 13 frames sit on top of the six photo booth layouts above, and each one arrives with a layout, a frame color, and a starting filter already set. Picking a frame therefore gives you a complete look in one tap, and you can still swap the frame color from more than 100 options after the shots are done.
Four-Slot Strip Frames
Eight of the 13 frames use the four-cut strip, which makes it the busiest of all photo booth layouts on the site. These eight differ mainly in mood, color, and the filter that switches on when you select them.
- Layout B keeps a plain white border with the Natural filter, so it works when you want the classic strip without any theme.
- Hearts uses a blush pink frame with sparkling hearts and the Hearts filter, which suits Valentine's Day, bridal showers, and best-friend photos.
- Dog adds puppy ears and a nose through the Dog filter on a white frame, and kids at birthday parties usually ask for it first.
- Vintage pairs a cream border and a date stamp with the 1970s Vintage filter, giving a warm sepia look like an old Kodak print.
- Solace uses a cool slate gray frame with the Y2K Cool Solace filter, a calm and minimal style that fits work events and modern weddings.
- Classic puts the Noir black and white filter on a near-black frame, which is the closest match to the old coin-operated booth strips.
- With Love combines a rose pink frame with the Golden Hour filter, so skin looks warm and soft for weddings and anniversaries.
- Holidays uses a butter yellow frame with Golden Hour, a cheerful pick for Christmas, Eid, Diwali and New Year parties.
If you want to know exactly what each starting filter does to skin and light, our guide to photo booth filters explains every look in detail.
Three-Slot and Two-Slot Frames
Layout A is the only three-slot frame, and it keeps a clean white border with the Natural filter so the larger photo windows stay in focus. Layout C is the only two-slot frame, and it uses the same white border and Natural filter for a simple, editorial finish. These plain frames are the right pick when your backdrop is already busy, such as a flower wall or a balloon arch. A plain border lets the scene do the decorating, while a themed frame in front of a busy wall can make a small panel look cluttered.
Grid, Single and Six-Slot Frames
Layout E, the grid, starts with the Cyberpunk Neon filter on a white frame, which gives group shots bold neon colors that stand out on a crowded feed. Studio Mode, the single Polaroid frame, opens with the 1970s Vintage filter, so the one photo looks like an instant print pulled from an old camera. Layout D, the six-shot sheet, uses a white frame with a grain filter that adds film texture without hiding faces. Because all three start with white borders, you can swap the white for your event's theme color from the frame colors menu once the shots are taken.
How to Choose Between Photo Booth Layouts and Frames
The fastest way to choose is to start with where the photo will end up, then work backward to the layout. The first table matches the destination to a layout, and the second matches your group and event to a frame.
| If the photo is going to... | Pick | Why |
|---|---|---|
| Instagram feed or profile | 2x2 grid | Keeps all four photos visible in the 3:4 tile |
| Instagram Stories or TikTok | Four-cut strip | Already tall, so it fills the 9:16 screen |
| A wedding guest book | Single or three-shot strip | Leaves room for a written note |
| A fridge, desk or wallet | Four-cut or two-shot strip | Classic shape that fits small spaces |
| A WhatsApp group chat | Four-cut strip | The sequence tells the joke |
| Group and event | Layout | Frame |
|---|---|---|
| Solo portrait | Single | Studio Mode |
| Couple at a wedding | Two-shot or four-cut | With Love |
| Friends at a birthday | Four-cut | Hearts or Dog |
| Family holiday party | Three-shot or four-cut | Holidays |
| Office or brand event | Four-cut | Solace |
| Group of five or more | Grid or six-shot | Layout E or Layout D |
These two tables cover most situations, so you rarely need to test every one of the photo booth layouts before an event.
Screen vs Print: Sizes That Matter
A photo that looks great on a phone can look different once it is printed, so it helps to know the sizes behind the photo booth layouts you pick. Printers and booth companies treat the 2x6 strip and the 4x6 sheet as standard sizes, and two 2x6 strips print side by side on one 4x6 sheet. That means a photo strip from the booth can go to almost any photo shop or home printer that handles 4x6 paper. TryPhotoBooth exports at 300 DPI, which gives a 2x6 strip about 600 by 1800 pixels of detail, enough for a sharp print at full size. Dark frames and dark filters such as Noir tend to print a shade darker than they look on a bright screen. Print one test strip before your event if paper copies matter to your guests.
Mistakes to Avoid
Most problems with photo booth layouts come from a few habits that are easy to fix once you spot them.
Picking the six-shot sheet at a busy event. Six countdowns take close to 30 seconds, and the line stalls once two or three groups are waiting behind you. Four shots is a sensible limit whenever people are standing in a queue.
Pairing a busy frame with a busy backdrop. A Hearts frame in front of a flower wall squeezes two patterns into one small panel, so let one of them stay plain.
Treating the layout as something you can fix later. You can change the border color after shooting, but a new layout means taking every single photo again.
Posting a tall strip to the Instagram profile grid. The 3:4 profile tile cuts off the top and bottom panels, so use the grid there and save strips for Stories.
A Reasonable Default
If you do not want to compare all the photo booth layouts, start with the four-cut strip and the Classic frame for a timeless black and white look. Switch to the Vintage frame for evening parties when you want warm, film-like tones on every panel. Run one test strip in your real room and light before guests arrive, since the same frame can look different on an iPhone in Safari than on a laptop webcam in Chrome. For setup help on a computer, read our guide on using a photo booth on a laptop or PC.
Frequently Asked Questions
How many photos do photo booth layouts take?
On TryPhotoBooth, the single layout takes one photo, Layout C takes two, Layout A takes three, the four-cut strip and the grid take four, and Layout D takes six. Each shot gets its own 3-second countdown, so you have time to change your pose between photos.
What is the difference between a photo strip and a four-cut?
A photo strip is any tall, narrow design with stacked photos, and it can hold two, three or four shots. A four-cut is a strip with exactly four panels, the style made famous by Korean booth brands like Life Four Cuts.
Which of the photo booth layouts works best for Instagram in 2026?
The grid works best for the main feed, because the 3:4 profile tile cuts much less of it away. For Instagram Stories and TikTok, a tall four-cut strip fits the vertical 9:16 screen far better.
Do I have to choose the layout before taking photos?
Yes, because photo booth layouts tell the camera how many shots to take during the session. If you change your mind after the countdowns end, you need to shoot again with the new layout.
Can I change the frame color after taking my photos?
Yes, you can pick from more than 100 frame colors and add stickers after your shots are taken. Only the layout stays locked once the camera starts counting down.
What size is a photo booth strip when printed?
A standard strip prints at 2 by 6 inches, and two of them fit on one 4x6 sheet of photo paper. Phone users can find setup steps in our guide to using a photo booth on iPhone.
Conclusion
The right choice always comes down to who is in the picture and where the photo will end up. Pick your layout first because it cannot change, then have fun with frames, colors and stickers afterward. Once you know what the six photo booth layouts and 13 frames produce, choosing takes seconds instead of guesswork. Open the layout page, choose a frame, and take your first strip for free in your browser.
Keep Reading
Ready to try this in your browser?
Launch our free 3D studio, test out vintage filters, and save your photo strip instantly.